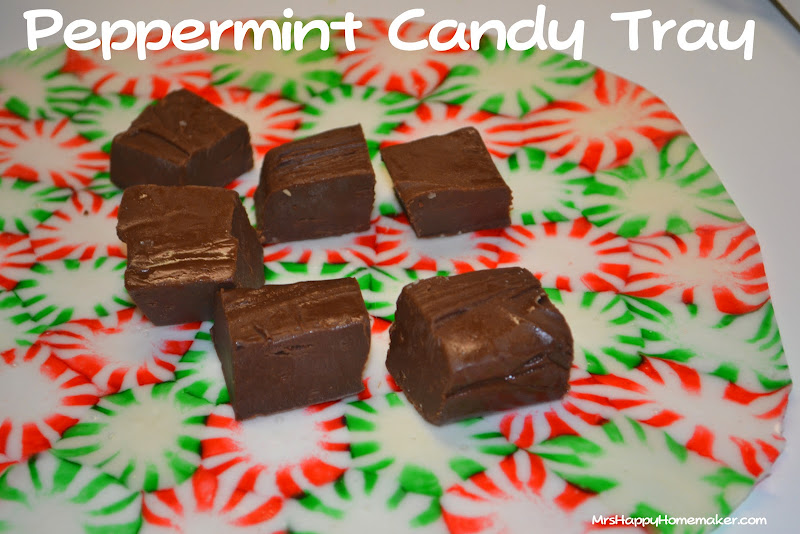
Ok, so I am pretty happy with the outcome of this project I did. I made a tray and a bowl out of peppermint candies! It is SO easy! I know I’m going to make more, it’s addictive. But, I just had to show you this neat little craft.
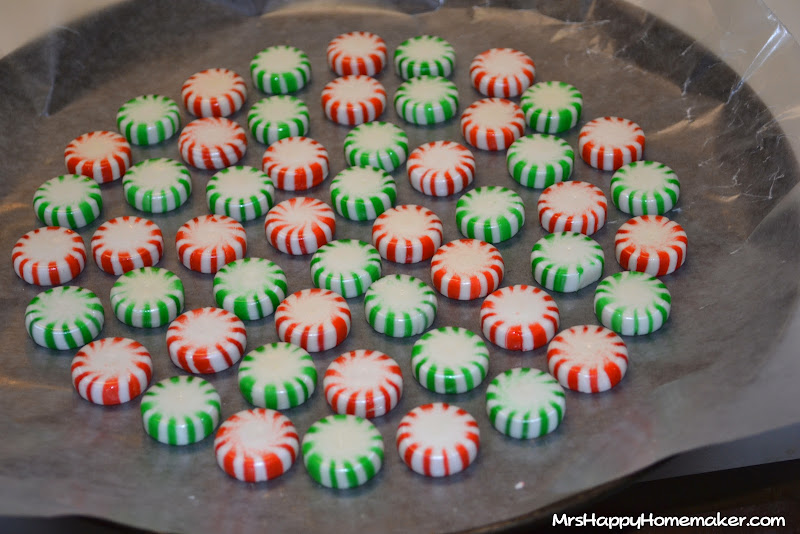
All you need is peppermint candies of your color choice, and parchment paper. I used both green and red – you could also use the same color.
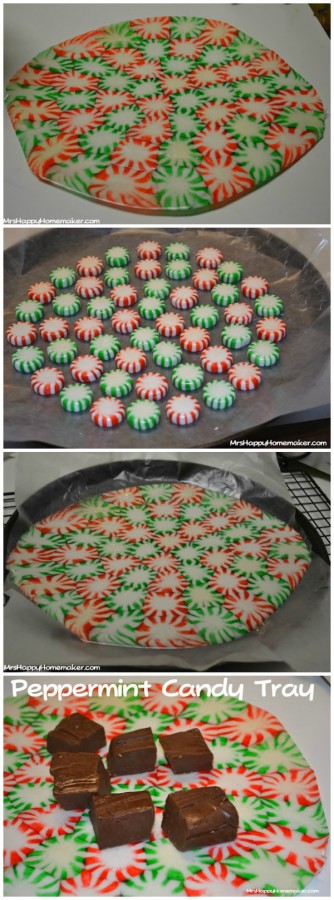
Just line up the candies in whatever pattern and shape of your choosing on a parchment paper lined baking sheet. Separate them just a tad, as shown.
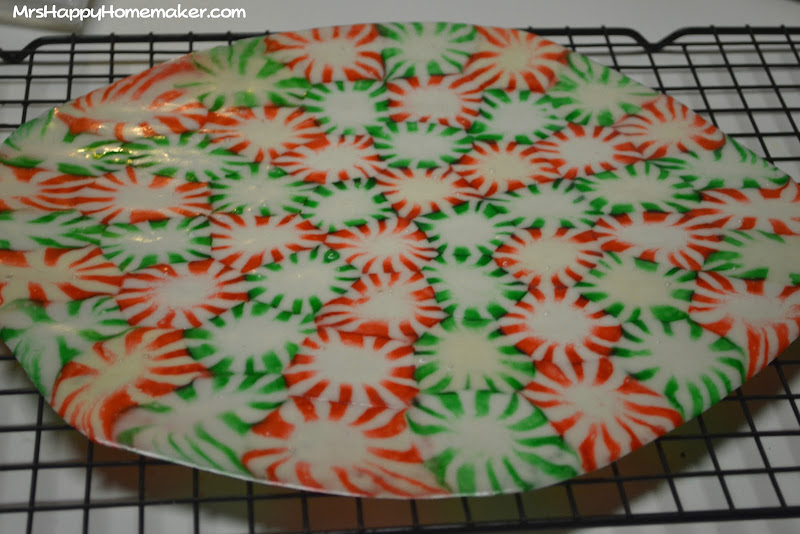
Bake it in an oven preheated to 350 degrees for about 7-10 minutes. Remove and set it on a wire baking rack to cool for a few minutes.
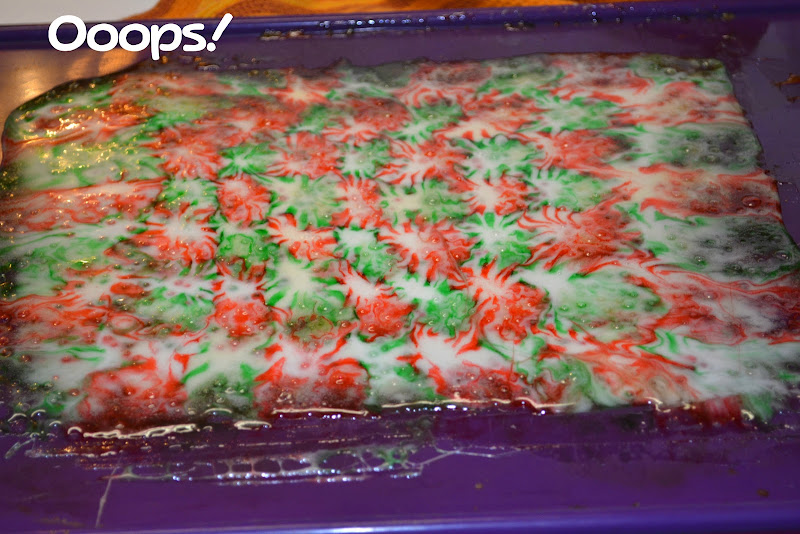
Make sure you watch that time!! You do not want it to over cook it. Refer to the photo below & don’t repeat my mistake!
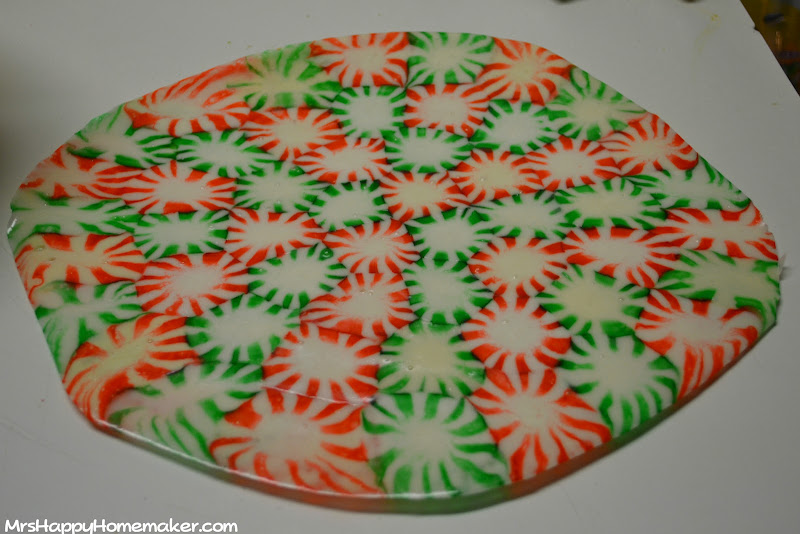
After a few minutes, carefully remove the parchment paper. Remember, these are fragile. Don’t get upset if all of it doesn’t come off – you aren’t going to be looking at the backside. Let the tray cool at room temperature for a couple hours. Do NOT place in the fridge to get it to cool faster – it will crack. I learned this the hard way.
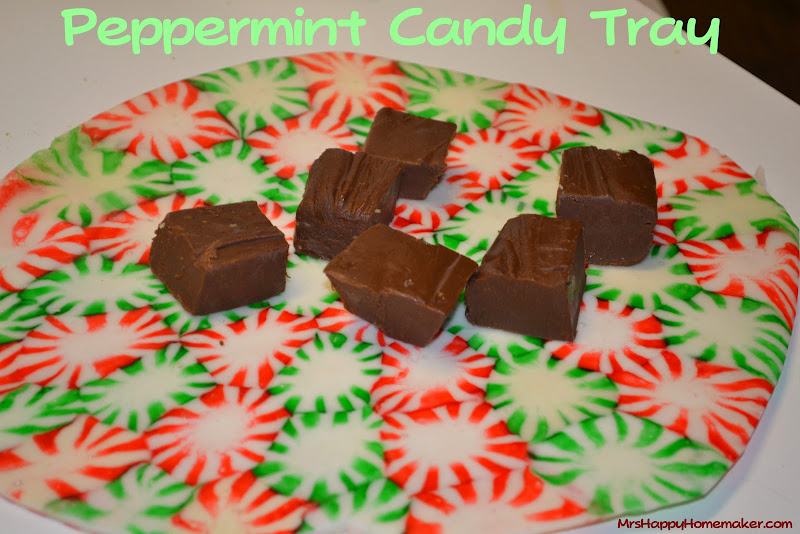
When it has cooled for several hours, it is ready to use. It should not be sticky – it should dry to be smooth & glossy. Do not use it to serve hot substances on. Stick with things like fudge, cookies, candy, and such. There should not be any flavor of the candies on the food.
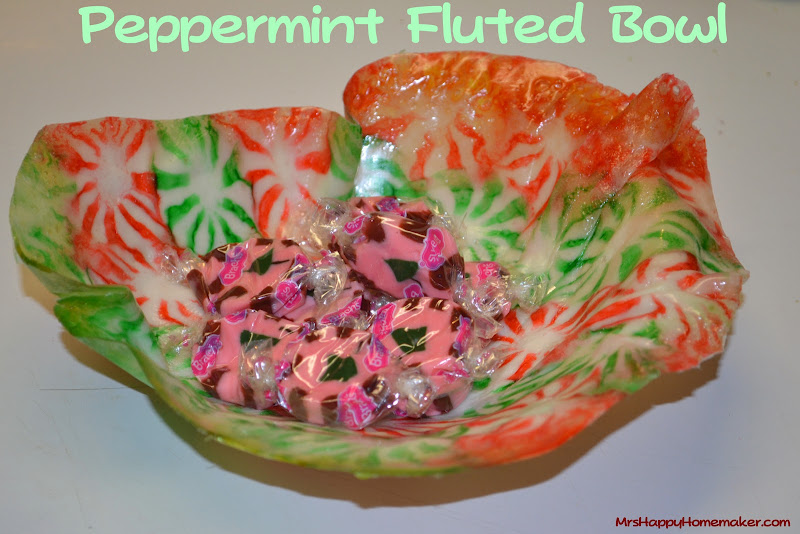
You can also try your hand at making a bowl. I made a small fluted edge candy dish. My ends were just starting to cook for too long, but since it had just started, it kind of gave the edges a stained glass look.
Or so I tell myself.
To make a bowl, after it has cooled for a few minutes – set the candy inside of a bowl with the parchment paper still attached. Using a dishtowel, press down very gently to form the shape of a bowl. If it hangs off the edge of the bowl a little, it will form a fluted edge. Remember now – gentle!
This is a great little craft to make with the kiddos too. If at first you don’t succeed, try again – and remember, timing & gentleness is everything!
I usually let my kids eat ours after we’re done with them, and I’ve never tried saving them. After they are dried completely, they will no be sticky. It can take up to 24 hours for the drying process to complete though.
hello crystal. thank you for your inspiration.. Im going to try this for Christmas this yr. how do you make the bowls again please. i understand the tray but not he bowl. thanks. patty
I’m not Crystal but I can answer how to make the bowl. After you bake and melt the candy in a flat pan, remove from the oven, and set inside a bowl while it’s still warm. Then use a dish towel to fit it inside the bowl. Let cool in the bowl. Then remove the parchment
Could you place a new layer of parchment on top of the candy tray and them drape it over the outside of an upside down bowl? Seems like this would make the bowl a more regular shape?
You could but an easier way would be to just take the parchment paper straight from the baking sheet and lay it on top of a bowl that way, with the peppermints on top. Thats how i did it and it came out so adorable…I was even able to flatten out the edges a bit because they draped over the bowl onto the table
You need to let them dry for several hours, then they won’t be sticky any longer. If the humidity level is high where you live, you may need to let them dry for 24 hours.
Let them keep sitting & keep drying. Sometimes it will take longer depending on the humidity in the air & other factors like that. Sometimes it can take up to 72 hours, depending on the weather/elevation.
I used nonstick release aluminum foil and it peeled right off the back of my tray. I re-used the one sheet of foil to make three trays. Thanks for this awesome idea!
AshSim, If you place them closer together and cook at a slightly lower temperature (i believe I did 335), you can get a stronger piece because it will be thicker. They will still be fragile because they are sugar art, but I found that this makes them handle manipulation better. I wait until they just fuse rather than waiting for them to become fully liquid. Then the edges don’t thin out as much.
I made ornaments last year. I heavily coated my cookie cutters with pam. You need to work quickly, and keep respraying cutters. Try to cut melted mints as closely as poss. I used a small flat head srewdriver like a skill saw to make a hole at the top for the ribbon. Do let them dry for a day or two. This year I am going to try to find some bakeable cutters because I had a lot of excess melted mint. Note that they are fragile, but are super cute!
I just found a recipe for candy cane syrup that I bet these could be broken up and used for after a person was done using them as a platter. I think I would stick with just one colour of peppermints though if I was making the syrup or it would be a nasty colour.
Clear hard candies should work just as well, we used to make stained glass cookies out of lifesavers, so had candies like Jolly Ranchers should work.
hey any hard candies works!!!! these where way fun to do with the kids!!!! we made a face with red hard candies and butterscotch hair and green candies as the skin.
my grandmother loved this project toooo! great family project!
We learned not all peppermint candies are created equal. The ones from Target melted really great – like the ones pictured. We couldn’t find green ones anywhere and a friend of mine found them at Walmart and bought us both green and red. The Walmart red was not as bright as the red on the Target ones before cooking and after cooking you could really see the difference. The Walmart ones did not melt as smoothly either.
I USED PAM ORGANIC OLIVE OIL SPRAY AND HAD THE MINTS LAYER OUT ON A COATED PAN. THEN SAW THE PARCHMENT PAPER INFO SO MOVED THEM ON TO PARCHMENT. THEY TURNED OUT PERFECT & SET UP SUPER FAST. TOP AND THE BOTTOM ARE EQUALLY BEAUTIFUL. THOUGHT ID SHARE THAT MISTAKE THAT TURNED OUT GREAT! THE ONES WITHOUT PAM ON PARCHMENT ARE STILL STICKY HOPING MORE TIME WILL ALLOW ME TO SEPARATE IT EASY. YES, THIS IS ADDICTIVE IM LAZY & THESE ARE QUICK – EASY & BEAUTIFUL. THANKS SO MUCH FOR THIS GREAT IDEA!!!
can you spray the wax paper with a nonstick before you put the candies on will that help take off the paper? or will the candies stay sticky. I am practicing now so i can make them for christmas. Thank you (:
So excited to create this candy plate, fluted bowl, and I’m going to attempt a fluted pie plate. Baking a large round circle using green mints. Once the baking time is completed I will gently place it into a shallow pie plate while fluting the edges. Once it’s completely cooked I will than prepare a chocolate pudding and delicately pipe whip cream stars on top of the pudding. I hoping the end result will be similar to a mint chip ice cream.


do these last from year to year? have you considered covering these with resin or a schellac?
They are fragile, so I’ve never attempted it myself. If you try it, I’d love you hear your results though!
Can u do this with butterscotch as well?
I’ve never tried it, so I can’t answer for sure – but I don’t see why not.
I’m sure you can!
do these last ..do they get sticky?
I usually let my kids eat ours after we’re done with them, and I’ve never tried saving them. After they are dried completely, they will no be sticky. It can take up to 24 hours for the drying process to complete though.
hello crystal. thank you for your inspiration.. Im going to try this for Christmas this yr. how do you make the bowls again please. i understand the tray but not he bowl. thanks. patty
I’m not Crystal but I can answer how to make the bowl. After you bake and melt the candy in a flat pan, remove from the oven, and set inside a bowl while it’s still warm. Then use a dish towel to fit it inside the bowl. Let cool in the bowl. Then remove the parchment
Thank you, June!! 🙂
Could you place a new layer of parchment on top of the candy tray and them drape it over the outside of an upside down bowl? Seems like this would make the bowl a more regular shape?
I’m sure you could do that, Suze!
You could but an easier way would be to just take the parchment paper straight from the baking sheet and lay it on top of a bowl that way, with the peppermints on top. Thats how i did it and it came out so adorable…I was even able to flatten out the edges a bit because they draped over the bowl onto the table
I have to do this….I love it!
why are my sticky . What can I do
You need to let them dry for several hours, then they won’t be sticky any longer. If the humidity level is high where you live, you may need to let them dry for 24 hours.
mine are still sticky after 24 hours what can I do to them so they won’t be sticky
Let them keep sitting & keep drying. Sometimes it will take longer depending on the humidity in the air & other factors like that. Sometimes it can take up to 72 hours, depending on the weather/elevation.
I used nonstick release aluminum foil and it peeled right off the back of my tray. I re-used the one sheet of foil to make three trays. Thanks for this awesome idea!
Love it 🙂 Thanks for sharing !
How do you get them to not be so fragile??
There really isn’t a way to make them stronger that I know of, unless you try covering with it with a schellac or something.
AshSim, If you place them closer together and cook at a slightly lower temperature (i believe I did 335), you can get a stronger piece because it will be thicker. They will still be fragile because they are sugar art, but I found that this makes them handle manipulation better. I wait until they just fuse rather than waiting for them to become fully liquid. Then the edges don’t thin out as much.
I jut did this! So easy and looks great! Edges aren’t perfect, but I made a candy candy dish!
Can you use cookie cutters to make ornaments? I can’t find how to do those – do you just make a tray and cut it out once it is out of oven? Thanks.
http://beta.abc.go.com/shows/the-chew/blogs/Craft-Corner/Holiday-Clinton-Kelly-Fantasy-Crafts?cid=facebook_chew
I made ornaments last year. I heavily coated my cookie cutters with pam. You need to work quickly, and keep respraying cutters. Try to cut melted mints as closely as poss. I used a small flat head srewdriver like a skill saw to make a hole at the top for the ribbon. Do let them dry for a day or two. This year I am going to try to find some bakeable cutters because I had a lot of excess melted mint. Note that they are fragile, but are super cute!
Pingback: Edible Christmas Treats!
can you eat the dish by cracking into piece later
You sure can – we do!
How do you get them to stay so well shaped?
can’t wait to try this
Pingback: Kid in a Candy Store DIY Fluted Bowls « What's On The List?
I ABSOLUTELY loved making these bowls! They were HEAPS of fun and will make great surprise presents for friends! Thank you for inspiring me to do!
I gave credit to you via my new blog too! Thank you for inspiring me too! WHOO HOO!
http://whatsonthelist.wordpress.com/2012/12/30/kid-in-a-candy-store-diy-fluted-bowls/
These are great has anyone shellacked one yet?
wondering if anyone used any other type of hard candies to do this too? like butterscotch or others like the mints…
OK, now I want fudge.
Pingback: Dairy River | dairy river is not a dairy
Thank you so much!! I need a favor for our Thanksgiving dinner, so I’m going to make a peppermint bowl with after dinner mints in it.
How about Jolly Ranchers!!
I’ve heard that the jolly ranchers work out great!
I just found a recipe for candy cane syrup that I bet these could be broken up and used for after a person was done using them as a platter. I think I would stick with just one colour of peppermints though if I was making the syrup or it would be a nasty colour.
Clear hard candies should work just as well, we used to make stained glass cookies out of lifesavers, so had candies like Jolly Ranchers should work.
Pingback: mjam crea…/ pepermunt… | ~ * Pagan Ouderschap / Pagan Parenting * ~
hey any hard candies works!!!! these where way fun to do with the kids!!!! we made a face with red hard candies and butterscotch hair and green candies as the skin.
my grandmother loved this project toooo! great family project!
What an adorable idea. I’m going to have to get some peppermints from the dollar tree and try this out! Thanks so much for sharing. <3 Kim
Does the food end up tasting like peppermint?
Nope, sure doesn’t!
I was wondering if anyone used shellac or something so you can preserve the dish to use again?
We learned not all peppermint candies are created equal. The ones from Target melted really great – like the ones pictured. We couldn’t find green ones anywhere and a friend of mine found them at Walmart and bought us both green and red. The Walmart red was not as bright as the red on the Target ones before cooking and after cooking you could really see the difference. The Walmart ones did not melt as smoothly either.
Pingback: Cute & Easy Christmas Ideas! - Mrs Happy Homemaker
I USED PAM ORGANIC OLIVE OIL SPRAY AND HAD THE MINTS LAYER OUT ON A COATED PAN. THEN SAW THE PARCHMENT PAPER INFO SO MOVED THEM ON TO PARCHMENT. THEY TURNED OUT PERFECT & SET UP SUPER FAST. TOP AND THE BOTTOM ARE EQUALLY BEAUTIFUL. THOUGHT ID SHARE THAT MISTAKE THAT TURNED OUT GREAT! THE ONES WITHOUT PAM ON PARCHMENT ARE STILL STICKY HOPING MORE TIME WILL ALLOW ME TO SEPARATE IT EASY. YES, THIS IS ADDICTIVE IM LAZY & THESE ARE QUICK – EASY & BEAUTIFUL. THANKS SO MUCH FOR THIS GREAT IDEA!!!
I just made two of these. how do you make a bowl?? I just did the trays.
I’ve made four of these and they turned out very pretty, but while they’ve been cooling on the rack, they’ve all cracked. What am I doing wrong?
Go to this site to get some custom candy made http://www.myidolpops.com/
can you spray the wax paper with a nonstick before you put the candies on will that help take off the paper? or will the candies stay sticky. I am practicing now so i can make them for christmas. Thank you (:
So excited to create this candy plate, fluted bowl, and I’m going to attempt a fluted pie plate. Baking a large round circle using green mints. Once the baking time is completed I will gently place it into a shallow pie plate while fluting the edges. Once it’s completely cooked I will than prepare a chocolate pudding and delicately pipe whip cream stars on top of the pudding. I hoping the end result will be similar to a mint chip ice cream.
Pingback: DIY Christmas | OUR BLOG