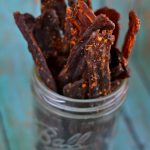
Homemade Beef Jerky Recipe That Beats Store-Bought
This post may contain affiliate links. If you make purchase after clicking a link, I may receive a commission at no extra cost to you.
I have a family full of beef jerky lovers, but tiny bags are so expensive! I’ve been wanting to make my own Homemade Beef Jerky for some time now. Y’all are gonna love this recipe that’s full of great beef flavor, with a hint of garlic, a little bit of spice, a tad bit of sweetness and a whole lot of deliciousness.

Homemade Beef Jerky
My family loves beef jerky—especially my kids. Buying it from the store always felt like a waste since a small bag cost anywhere from $5 to $7 and never lasted more than a day.
My oldest daughter is the worst (or best, depending on how you look at it). She could easily devour two whole bags in one sitting! At that price, it really started to add up.
To save money, I set out to find a great homemade recipe. I tried several, and while some were good, none of them were just right.
So, I started experimenting with my own!
I began by tweaking the marinade, adding ingredients I knew would enhance the flavor, and adjusting as I went based on the final taste.
After plenty of trial and error, I finally nailed it—the perfect beef jerky, at least according to my family!
Why You’ll Love Homemade Beef Jerky
- Budget Friendly: A gallon Ziploc bag filled 3/4 of the way costs less than $15 (getting meat from my local butcher). That’s a lot of beef jerky, and a heck of a lot of savings!
- Customizable Flavors: Try adding black pepper, red pepper, onion powder, liquid smoke, teriyaki sauce or even a little bit of honey.
- High Protein Snack: One large piece of beef jerky has about 7 grams of protein!
- Great for Camping and Hiking: A bag of beef jerky fits perfectly in your pocket or backpack, and is the best way to fuel up on the go.

Ingredients for Homemade Beef Jerky
- Bottom Round Beef Roast: You’ll need 3 pounds of lean cut of meat. Bottom round is one of the best cuts of meat for making homemade jerky because it has very little fat, which helps it last a long time without going bad.
- Soy Sauce: Gives the jerky strips a deep, salty flavor and helps tenderize the beef slices.
- Worcestershire Sauce: Adds a little bit of tangy, savory flavors to the jerky marinade.
- Italian Dressing: A surprising ingredient, but trust me, it works! The mix of vinegar, herbs, and oil helps break down the meat slices so they stay tender and flavorful.
- Hot Sauce: Pick your favorite hot sauce for an extra kick. My favorite is Ring of Fire, which I discovered after seeing it on Food Network.
- Brown Sugar: Just a touch of brown sugar balances out all the savory flavors and gives your jerky strips a hint of sweetness.
- Olive Oil: A little drizzle of oil keeps the meat slices from drying out too much.
- Steak Seasoning: A good blend of black pepper, salt, and spices makes the jerky tastes bold and delicious.
- Garlic Powder: Brings out the rich, savory flavor we all love in good jerky.
How to Make Homemade Beef Jerky
- Freeze the Beef Slightly: Place your cut of meat in the freezer for about an hour. It makes it easier to slice into thin strips.
- Slice the Beef: Once the meat is partially frozen, use a meat slicer or a sharp knife to cut thin slices against the grain. Cutting it this way helps make tender jerky that’s not too tough to chew.
- Make the Marinade: In a medium bowl, mix all your marinade ingredients: soy sauce, Worcestershire sauce, brown sugar, garlic powder, and any red pepper you like. Stir well with a wooden spoon until everything is combined.
- Marinate the Beef: Place your sliced beef in a large Ziplock bag. Pour the jerky marinade over the meat slices, making sure they’re well coated. Seal the bag and refrigerate overnight, or at least 8 hours, for the best results.
- Drain the Marinade: Take the beef out of the sealed container and let any excess marinade drip off. Use paper towels to pat the jerky strips dry before dehydrating.
- Dehydrate the Jerky: Lay the beef out in a single layer on dehydrator trays. Set your food dehydrator to 160°F. The drying process can take 4-8 hours, depending on your machine.
- Oven Method: If you don’t have a dehydrator, you can use your oven. Place the meat slices on wire racks set over a baking sheet. Cook at 165°F for 1-3 hours, leaving the oven door slightly open to let moisture escape.
- Check for Doneness: The beef jerky should be dry but still slightly flexible. If you bend a piece and see white fibers, it’s done. If it snaps, it’s overcooked.

Recipe Tips
- Choose the Right Cut: Use lean cuts like bottom round, top round, or flank steak. Fat can make your homemade jerky spoil faster.
- Slice Against the Grain: Cutting against the grain makes your jerky strips more tender. If you cut with the grain, the jerky will be chewier.
- Marinate for Best Flavor: Let the meat slices soak in the jerky marinade for at least 8 hours (overnight is even better) to get a bold, savory taste.
- Use a Food Dehydrator for Best Results: A food dehydrator dries jerky evenly and gives it the best texture.
- Lay in a Single Layer: Spread the jerky strips in a single layer on dehydrator trays or wire racks to ensure even drying. Don’t let them overlap.
Ways to Serve Homemade Beef Jerky
- On Its Own: Homemade beef jerky is a great snack all by itself. Just grab a piece and enjoy.
- With Cheese and Crackers: Pair your jerky strips with some sharp cheddar, pepper jack, or smoked gouda and some crunchy crackers for a simple, high-protein snack.
- Chopped into Trail Mix: Cut your jerky into small pieces and mix it with nuts, dried fruit, and a little bit of chocolate for a hearty road trip snack.

How to Store Your Jerky
To keep your homemade beef jerky fresh and tasty, store it the right way. Let it cool completely before packing it up to help prevent moisture from getting trapped.
- Short-Term Storage (Up to 2 Weeks): Keep your jerky strips in an airtight container, Ziplock bag, or a sealed container at room temperature. Store it in a dry place, away from heat and sunlight.
- Longer Storage (Up to 3 Months): Store sealed in the fridge for up to 3 months. Use a vacuum sealer for the best results, but a plastic zip-top bag with the air pressed out works too.
- Freezer Storage (Up to 6 Months or More): If you made a big batch, freezing is the best way to keep it fresh. Place your jerky strips in a vacuum-sealed bag or airtight container before freezing. Just let it come to room temperature before eating.
The Mrs's Homemade Beef Jerky
Ingredients
- 3 pounds bottom round beef roast
- ¼ cup soy sauce
- ¼ cup Worcestershire sauce
- ¼ cup Italian dressing
- ¼ cup of your favorite hot sauce I recommend Ring of Fire
- ¼ cup brown sugar
- 2 tablespoons olive oil
- 2-3 tablespoons steak seasoning
- 2-3 tablespoons garlic powder
Instructions
- Freeze your roast partially - this makes it easier to slice it thin. Once partially frozen, cut the roast against the grain in thin uniform slices.
- Combine the marinade ingredients in a bowl. Place the beef in a large ziploc bag (or other sealable container) and pour over the marinade. Seal the container, and refrigerate overnight - or at least for 8 hours.
- Drain the marinade off of the beef, and place the beef slices in your dehydrator. Run the dehydrator until the beef is thoroughly dried. Your dehydrator should have a guide as to how long this takes per your machine. It can take anywhere from 4-8 hours depending on your dehydrator.
- If you don't have a dehydrator, you can also use your oven. Place your sliced beef on a wire rack set upon of a baking sheet, Cook at 165 degrees for 1-3 hours or until your meat is cooked thoroughly.


You mentioned you did some research on dehydrator’s – will you share that info. I am wanting to get one for all the summer fruits and veggies. Thanks for the wonderful recipe.
Yes, definitely! Before I found mine at the thrift store, I was going to buy this one from Nesco. It has great ratings & reviews – and is the number 1 best seller of dehydrators on Amazon. Here’s the link, hope this helps! http://amzn.to/1kI4rfc
Our new Samsung Gas range has dehydration feature.
Haven’t had a chance to try it yet.
A woman who use to work at a jerky company told me, I need to place the meat on trays with holes on them (like for BBQ vegtable tray) need air circulation.
The grocery store butchers are willing to slice the meat 1/4″, they suggested “London Broil”.
Your recipe says “bottom round beef roast ” suppose I could try some of each to see what I like best.
I think the idea is lean meat.
Thank You
What kind of steak seasoning? Montreal? Does the seasoning have salt?